When every email you send is important, hosted email services like Google Apps and Microsoft Exchange are a blessing. Unfortunately it’s not a free blessing – you can count on spending $4-5 per month for each user. This article shows you how to get free, enterprise-level email hosting on your domain name using Outlook.com.
What’s the big deal?
Nearly every business we work with relies on email. We all use email to communicate with customers, staff and co-workers every day. We use it for sales, support and outreach. Entire teams coordinate on complex projects over email.
Chances are your Web host provides email hosting for your domain, and for some this works great. But if email is a vital tool for your business, you may have outgrown the standard POP/IMAP email accounts offered in your Web hosting package.
Email is a critical business tool that often gets overlooked.
Small businesses used to be able to get free email hosting on custom domains with Google Apps, but back in 2012 they shut it down. Not a lot of alternatives exist now for solid email hosting on your own custom domain name without a fee attached.
Email hosting services Outlook and Gmail have a lot of perks, not the least of which are:
- Faster, more reliable email accounts
- Smooth, speedy webmail that’s actually nice to use
- Globally redundant servers with near-zero downtime
- Cutting edge malware protection
- Enterprise level anti-SPAM filtering
- If your website goes down, your email doesn’t go down with it
Another less obvious but substantial benefit is that you can speed up your own website. By moving email to another server, you reduce the work your Web server has to do. The end result is faster, more reliable email and a happier Web server.
And happy Web servers mean happy visitors.
You can easily set up an @gmail.com or @outlook.com email address for free, but when it comes to your work, it’s vital to use your own domain name. Emailing your clients from ra*************@ho*****.com might be slightly unprofessional, even if you’ve “had that same account since college and just haven’t gotten around to changing it” (sure, buddy).
Using a free @hotmail.com address might not seem like a big deal, but think about how many people you have emailed. How many you plan to email. Every time they see your email address, is should be firmly associated with your business name.
How to set up Outlook.com with your custom domain
Okay, so you’re ready to get going and set up your domain name to use Outlook.com email services.
First, a few basic requirements. In order to use email on your custom domain with Outlook, you will need:
- A domain name
- Access to your domain’s DNS records
- An existing email account or phone to verify your account
You need to make sure you have access to your domain name’s DNS records and can make custom entries. If you aren’t familiar with DNS and MX records, you may need some help from your Web host to make the required DNS changes.
Once you’re ready, there are 5 basic steps to set up email hosting with a custom domain name.
1. Create a new Microsoft Account
If you already have a Microsoft Account, you can skip this step. If you want to keep your current Microsoft account separate, you can create a second account specifically for your email hosting.
Head over to Microsoft’s website and create a new Microsoft Account. You can enter the email address you currently use on your custom domain (eg. bo*@my********.com), but if you plan on transferring this email address you can just create a new @outlook.com, @hotmail.com or @live.com address. Any of the three works the same.
2. Add Your Domain in Windows Live Admin Center
Now you can go to the Windows Live Admin Center and set up your domain name for email.
Once you are signed in, you’ll be able to see your domain manager.
- Click on Add Domain.
- Under “Provide your domain name” enter your domain name, eg. mybusiness.com.
- Under “Choose mail service for your domain” make sure that “Set up Outlook.com for my domain” is selected.
- Click Continue.
- Review your settings and click I Accept.
Now your domain name has been added to your Microsoft Account.
Next, we need to configure your DNS records and finalize the email services configuration.
3. DNS and Mail Setup
After adding your domain, you will be directed to the domain settings page.
Next comes the technical part – if you aren’t familiar with DNS this is where you should reach out to your Web host or developer for assistance. This page looks rather intimidating, but really it just involves making three custom DNS entries. This should be a piece of cake for your Web people.
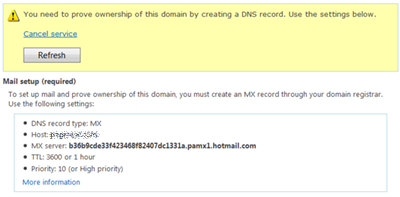
Right off the bat you will see a yellow warning message that you need to prove ownership of your domain, followed by a bunch of custom DNS records details that will be required for hosting your email on a custom domain with Outlook.

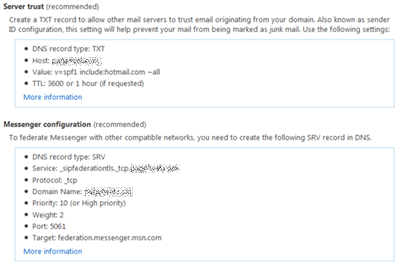
The sections we need to pay attention to are Mail setup, Server trust and Messenger configuration. Items under Prove domain ownership are not required, since adding the MX records under Mail setup will cover domain ownership.
Mail setup (required) – This is a standard MX record entry. Add to your DNS records and restart your DNS server if necessary. You may need to remove existing MX record entries, and also configure your Web server for your account to use a remote mail server. Once completed, you can return to Domain Settings on your Microsoft Account and click Refresh. It might take some time for the DNS change to register, but typically DNS changes like this should be quick if done correctly.
The next two DNS changes are Server trust and Messenger configuration.

Server trust (recommended) – This entry is important, as it can help ensure deliverability of your emails. Essentially you are allowing your DNS server to verify that Microsoft is authorized to send email for your domain name.
Messenger configuration (recommended) – Not necessary, but it doesn’t hurt to add it. This allows your server to play nicely with Messenger-related Microsoft compatible networks.
Once completed with the above steps, you should be ready to use your domain name to send & receive with Outlook.com – as well as sync calendars, contacts and tasks just like you would on an Exchange account.
Now, we just need to add the custom email addresses you want to use.
4. Custom Email Address Setup
Now we’re ready to add your custom email address.
Head over to your Microsoft Account. Click on Account Aliases.
These are all of the email addresses that are connected to this Outlook account. You can add multiple addresses here for your custom domain or on @outlook.com, @live.com and @hotmail.com.
Go ahead and add a new alias for your new custom email address, eg. bo*@my********.com.
Once created, it should be effective immediately, and you are ready to use your new email address to:
- Access email, calendars & contacts with Outlook.com
- Add your custom email account to Outlook on the desktop
- Add your custom email to your mobile devices
5. Set Up Email on Desktop and Mobile Devices
Excellent – now you’re ready to use your new email account on your very own custom domain!
The first thing to do is to test it out over Webmail at Outlook.com. You may find that the Webmail interface is ideal and won’t use another email client. If you use Outlook on the desktop or want access on your mobile email accounts, you can go ahead and add your new address to Outlook, your iPhone, Android, Windows Phone, etc.
If you are an Office 365 subscriber, you’ve already got Outlook 2013 on your desktop. Set up your email account as a new Hotmail/Exchange account. If you don’t have Outlook 2013, you can also download Windows Essentials and get a copy of Windows Live Email. This is actually an excellent, free mail client with calendar and contact integration.
For mobile devices, we’ve tested our custom domains on Windows Phone (Nokia Lumia 920), Android (Samsung Galaxy S4A) and iPhone with great success. It should work on any mobile device or tablet that supports email.
On Windows Phone, you can add your address as an Exchange account and it will automatically set up push notifications (for super fast email notifications), and optionally contacts, calendars and tasks.
On Android, you can set up with the standard email client, or you can install the Outlook.com App from the Google Store. This is actually a pretty slick little app that supports multiple Outlook accounts.
For iPhone and other mobile devices, just add the account as you would a normal Outlook/Hotmail email account.
If you encounter problems with your PC or device picking up the correct settings, try using the mail server m.hotmail.com. The device will then usually pick up the correct server, like blu-m.hotmail.com, and configure accordingly.
Are there any drawbacks?
Using Outlook.com and custom aliases seems like the perfect solution, so why would anyone bother with the paid service?
The paid accounts offered by Google Apps for Business and Microsoft Exchange Online guarantee you a huge attachment sizes, slightly improved integration with their supported products and other benefits that you might not get with a free account.
Oddly enough, Outlook.com provides unlimited mailbox sizes to free users, but Exchange users are limited to 50GB. Go figure.
Configuring your email account on all of your devices might be the hardest part. It’s usually a simple process, but there are a lot of settings working behind the scenes. Email client configuration can be a hassle with a typical POP/IMAP account or any other mail server. Setting up your Outlook-hosted email account is generally easier, since you don’t need to manually enter all of the server settings. If you get stuck, however, it will require a little technical expertise to dig into the advanced settings on your device.
Apart from a few reasonable concerns that accompany any email provider, the advantages of free business-class email hosting on a custom domain far outweigh the negatives for most of us.
Conclusion
This article was created to shed some light on using custom domain names for free email hosting with Outlook. Using this method can be a huge upgrade for your email, it can help speed up your Web server, and improve the deliverability and reliability of your business email accounts.
So far, this method provides a really solid alternative to Google Apps for Business, and you won’t be spending $4-5 every month for each and every user you have.
Our goal is to help your small business get a major email upgrade and save money at the same time. We do hope this how-to guide has been helpful for you and any other small businesses in Maine and around the world.
If you have questions, feedback or would like to add any additional information to this article, please leave a comment below.
Please contact Intavant if you have questions about your email hosting or web hosting in Maine. We have helped hundreds of businesses with Web hosting and business email, and we would be pleased to answer your questions.


